Friday, June 28, 2019

Scrapping for Less Flavor of the Month - June 2019


Where is your most favorite place in the world? Well other than Ireland (oh how I love that country...another story for another day) my favorite place would be the beach and the ocean. I love and am fascinated by anything and everything that has to do with sand and saltwater! So, let's dive deep and see if we can spot any Under the Sea babies in that wonderful blue ocean water. Dive on through the hop and SEA what our fabulous designers brought to the surface for you! Make sure you visit the Scrapping for Less website to grab your kit of "Under the Sea Babies" and you too can get lost in an ocean of cards. *Make sure to enter the Rafflecopter for a chance to win a prize!
"Use the hashtag #FOTMundertheseababies in your social media showing projects you made using the June "Under the Sea Babies" Flavor of the Month Card Kit. We will pick someone who uses that hashtag and highlight them on all of Scrapping for Less' social media. We want to see what you make!"


Now onto my cards:
 This card is from Collection 1 using Sketch 4.  The skin is colored with E000, E51, E53.  Her hair is colored with YR12 and YR14.  Lastly, her fin and top are colored with RV55 and RV66.


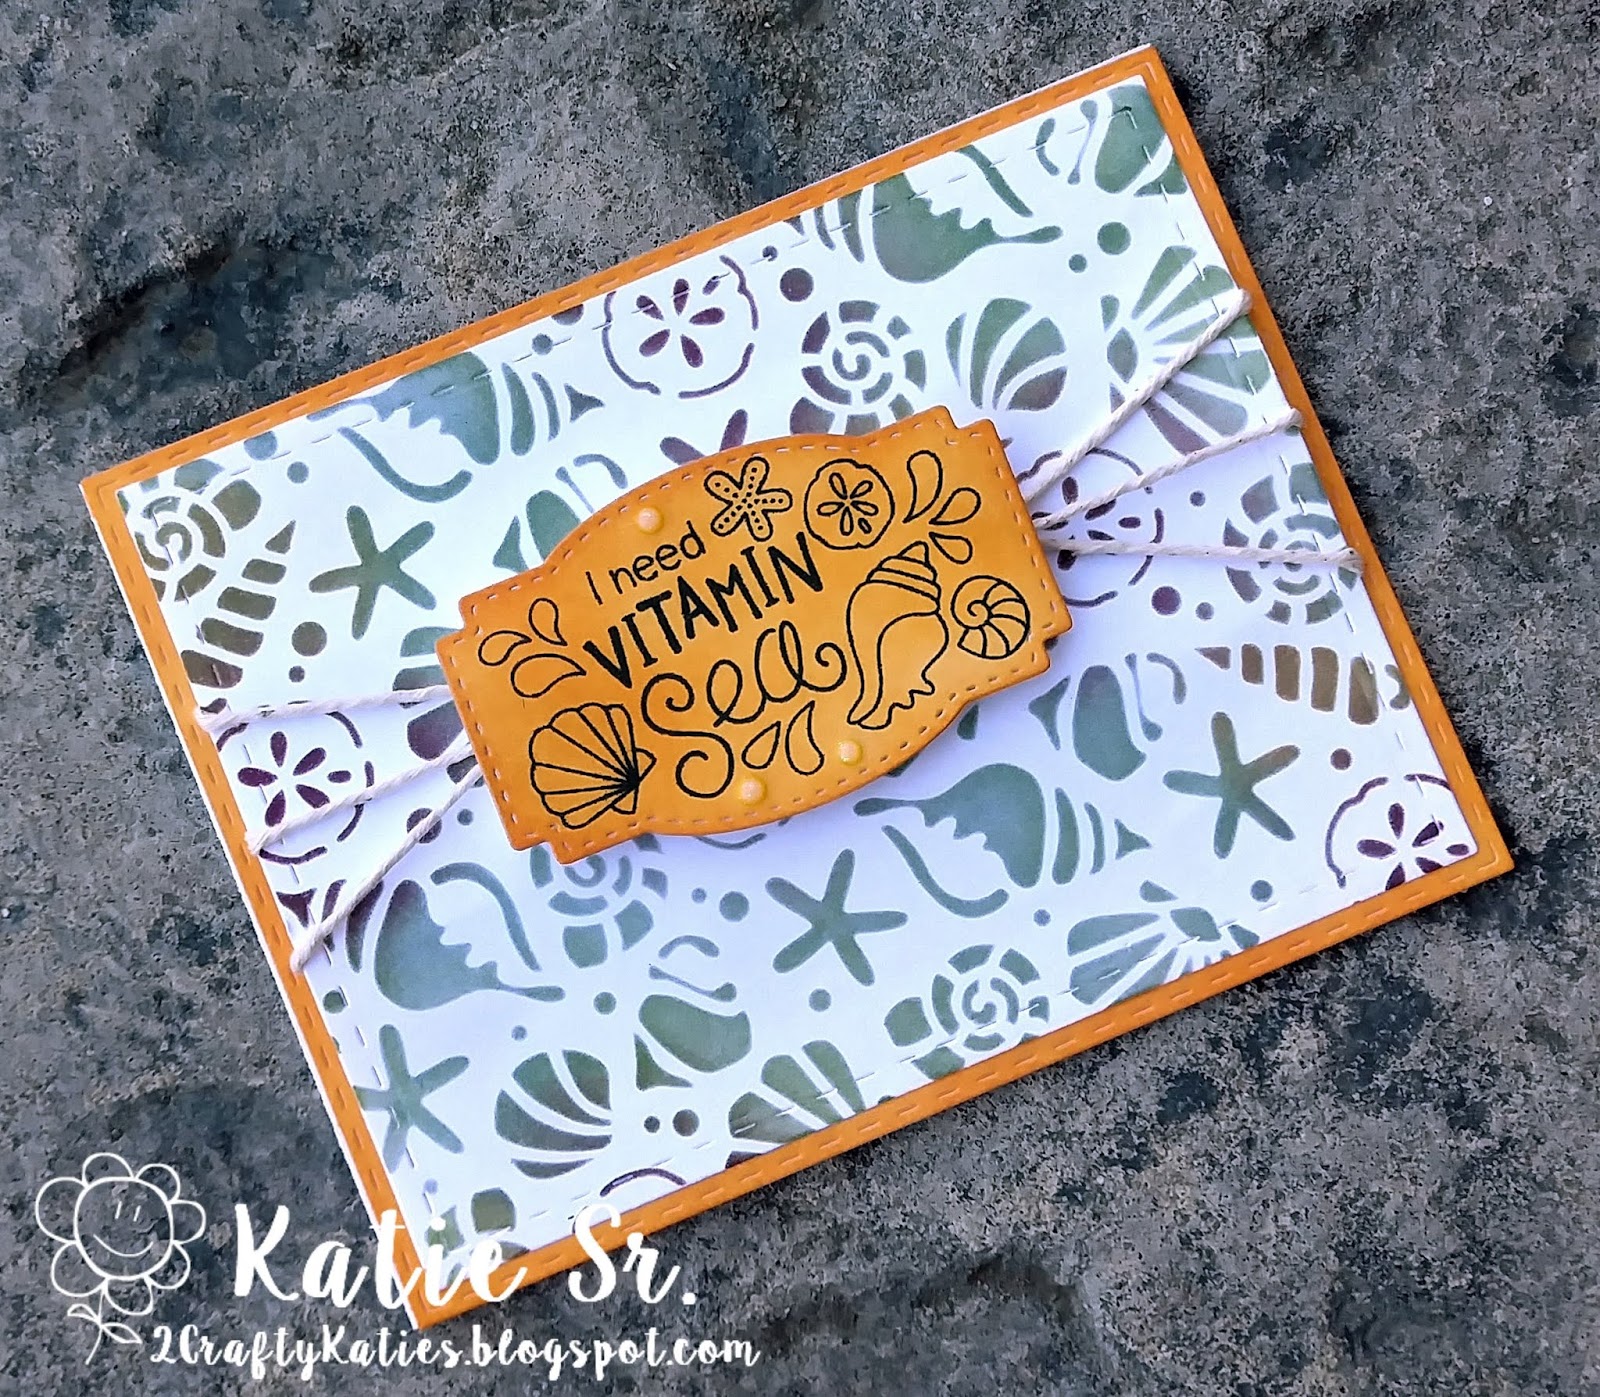
This card is from Collection 2 using Sketch 2. The fish is colored with YR12, YR14, & Y38.  The octopus is colored with Y02 and Y15.


 This card is from Collection 3 using Sketch 3.  I colored him with the following copic markers; E21, E25, E33, & E35.


This card is from Collection 4 using Sketch 3.  I made this card last and I was watching a movie with my son and I wasn't paying attention.  This collection should have been using sketch 1.  I didn't even catch that until my son asked where sketch 1 was.  I colored the turtle with G21, YG11, and YR12.  The sea horse is colored with YR12, YR14, and Y38.


Here is what is in each of the collections! 


This is the BEST option!  

I hope that you enjoyed my inspiration.

Up next is the lovely Desiree!
Thank you for stopping by.  Make each day creatively crafty and stay tuned for more craftiness!

~2CraftyKaties

Wednesday, June 26, 2019

Scrapping for Less - SNEAK for June 2019 FOTM


Good Morning and Happy Thursday fellow crafters!
Today I am on the Scrapping for Less blog to share a sneak from the June 2019 Flavor of the Month kit!


I used the stamps and paper from collection 3. 
When I saw the otters and then the sentiment I instantly thought of Yin and Yang!  So, I VERY carefully stamped them together and used my scan and cut to get this image!  I used the following copic markers on the otters and in the space between them (I didn’t want the white space to be a focal point); BG23, E11, E25, E33, E35.  The layout was inspired by Tuesday Morning Sketches #509:


Remember to share your June "Under the Sea Babies" Flavor of the Month Card Kit creations with us and use the hashtag #FOTMundertheseababies in your social media!  We will pick someone who uses that hashtag and highlight them on all of Scrapping for Less' social media. We want to see what you make!"

To order the Flavor of the Month, click here and subscribe so that you never miss a month!   Thank you for stopping by.  Make each day creatively crafty and stay tuned for more craftiness!

~2CraftyKaties

Tuesday, June 25, 2019

Die Cuttin’ Divas #426 – Happy Birthday


Good morning!  I hope this blog post finds you well this beautiful Tuesday morning!  Today is a start of a new challenge from Die Cuttin’ Divas.  This week’s challenge is “Happy Birthday!”  You can never have enough birthday cards on hand.  The challenge will run from today, Tuesday, June 15th until Monday, July 1st. 

Here is my inspiration for you: 


Here is what I used:
The Stamps of Life – Center Step A2 Card Die
Jaded Blossom – Birthday Dies
DCWV – Cotton Bloom 12x12 paper stack

Again, thank you for stopping by and I looking forward to seeing your creations!  Make each day creatively crafty and stay tuned for more craftiness!

~2CraftyKaties

Monday, June 24, 2019

Always Fun Challenges #116 – Fun at the Beach


Good Morning and Happy Monday!  Today is a start of a new challenge from Always Fun Challenges.  This week’s theme is “Fun at the Beach!” The challenge will run from today, Monday, June 24th to Saturday, June 30th. 

Here is my inspiration for you:


Here is what I used: 
Newton’s Nook Designs – “Vitamin Sea” stamp set
Newton’s Nook Designs – “Seashells” stencil
Ranger – Distress Oxide “Tumbled Glass” ink
Ranger – Distress Oxide “Carved Pumpkin” ink
Ranger Distress Ink – “Peeled Paint”, “Stormy Sky”, “Tea Dye”, & “Seedless Preserves”
Nuvo Glitter Drops – “White Blizzard”


Looking forward to seeing your creation!  Thank you for stopping by.  Make each day creatively crafty and stay tuned for more craftiness!

~2CraftyKaties

Thursday, June 20, 2019

Scrapping for Less & Newton’s Nook Designs and Stampendous


 Good Morning and Happy Thursday!  Today I am on the Scrapping for Less blog to share with you TWO different cards using Newton’s Nook Designs “Vitamin Sea” stamp set & “Seashells” stencil and Stampendous “Cling Jellyfish stamp !

 Here is what I created:  
These first 6 cards were inspired by video that Jennifer McGuire posted about a week ago.  I used my Gina K 3.5”x 3.5” wreath builder template with the Ranger Distress Oxide inks and stenciled the corners of the cards.  Next, I cut paper 3.75”x 3.75” and shaded the outside edges.  Lastly, I cut 4”x 8” cardstock for my card base.  I LOVE this technique that Jennifer shared with us in her video.  I am looking forward to using this technique in the future.


 Here is what I used: 
Newton’s Nook Designs – “Vitamin Sea” stamp set
Newton’s Nook Designs – “Seashells” stencil
Ranger – Distress Oxide “Tumbled Glass” ink
Ranger – Distress Oxide “Carved Pumpkin” ink
Ranger Distress Ink – “Peeled Paint”, “Stormy Sky”, “Tea Dye”, & “Seedless Preserves”
Nuvo Glitter Drops – “White Blizzard”

My next card I struggled with.  I just wasn’t sure how I was going to put it together.  I started by stamping out the “Cling Jellyfish” from Stampendous and using my Scan n’ Cut to cut it out.  I then took the “Tumbled Glass” Distress Oxide ink and shaded the whole the jellyfish.  Then, I took the “Carved Pumpkin” and pressed the ink pad into an acrylic block to use as a paint pallet.  I then painted the jelly fish in “Carved Pumpkin” and highlighted the circles with the “White Blizzard” Nuvo Glitter Drops.  I then cut a card base 4”x 5.25” and “double stamped or 2nd generation stamping” the jellyfish (inking the image and stamping once on scrap paper and then stamping a second time on the card base).  Lastly, I cut a card base 4.25”x 5.5” and shaded with the “Carved Pumpkin” Distress Oxide ink.  Once all of this was done, I used foam squares to pop the jelly fish and assembled the card.

Here is what I created:

Here is what I used: 
Stampendous – “Cling Jellyfish” stamp
Ranger – Distress Oxide “Tumbled Glass” ink
Ranger – Distress Oxide “Carved Pumpkin” ink
Nuvo Glitter Drops – “White Blizzard”

  
 Thank you for stopping by.  Make each day creatively crafty and stay tuned for more craftiness!

~2CraftyKaties

Monday, June 17, 2019

Always Fun Challenges #115 - Punny


Good Morning and Happy Monday!  Sometimes in life you need a break.  I took a much needed 3 week break from all of my design teams.  I feel refreshed and ready to create! 

Today is a start of a new challenge from Always Fun Challenges.  This week’s theme is “Punny!” The challenge will run from today, Monday, June 17th to Saturday, June 23rd. 

Here is my inspiration for you: 


Urban Dictionary defines the word “Punny” as “a play on words for the word “funny”.  It is a pun in itself. 

 With this definition I knew I wanted to use a Lawn Fawn stamp set.  To me, Lawn Fawn screams “Punny”.  I decided on the mini stamp set “So Jelly”.  I used my Jaded Blossom card mat die and cut the base.  Then I used the star image and I free hand stamped a background.  I then stamped the start on another piece of paper and took my Tim Holtz distress blender tool and “colored” the star.  Then, I fussy cut it out.  Here is a trick to get rid of the white on your fussy cut images, use a dark colored copic, I used C7, and shade the edge! 

Next, I used a pop dot for dimension.  I then took another piece of white scrap paper and cut out the dimensional banner.  I placed the cut-out piece back into the paper and I used the Tim Holz distress blender tool to “color” the banner.  I didn’t like the dimension of the banner, so I snipped the ends and used more pop dots!  I then grabbed a card base and shaded the edges with the “carved pumpkin” in and glued everything down!  Below is a list of what I used with links on where to purchase!

Here is what I used:
Lawn Fawn “So Jelly” Stamp set
Ranger Distress Oxide “Tumbled Glass” and “Carved Pumpkin” inks


Looking forward to seeing your creation!  Thank you for stopping by.  Make each day creatively crafty and stay tuned for more craftiness!

~2CraftyKaties

Friday, June 14, 2019

Cut It Up Challenge # 176 – Welcome Summer


Good Morning and Happy Friday! Sometimes in life you need a break.  I took a much needed 3 week break from all of my design teams.  I feel refreshed and ready to create!

  Today is the start of Cut It Up Challenge #176. The theme is “Welcome Summer”. This challenge is sponsored by Newton’s Nook Designs and the winner will receive $20 in store credit!

This challenge will run from today;
Friday, June 14th, until Wednesday, 26th.

Here is my inspiration for you! 


Summer to me screams flamingos!  I started with cutting my card mat using my Jaded Blossom "Card Mat Die" and my Tim Holtz blending brush with my Stamp AnnieThing "Blossom Ink", working my way in from the outside to the inside.  Next, I stamped my "Flamingo Flock" in Momento Black Ink.  I colored only the beaks with my copic markers.  Then, I took the Stamp AnnieThing "Tangerine Ink" and shaded the card base.  I didn't have die that said "Summer" (hint*hint*) so I used "Aloha" instead.  Cutting it out three time to layer it and give it depth (not my idea, Jennifer McGuire's), also shading it with "Tangerine Ink".  Finishing with some white gel pen for accent!  

Here is what I used: 


Tropical Dies 2 (sentiment)

Copics
C7, YR12

Looking forward to seeing your creation!  Remember, only one entry per person and you must have a die cut!

Thank you for stopping by.  Make each day creatively crafty and stay tuned for more craftiness!

~2CraftyKaties


Thursday, June 13, 2019

Scrapping for Less & La-La Land Crafts


Good Morning and Happy Thursday!  Today I am on the Scrapping for Less blog to share with you TWO of my latest card using La-La Land Craft’s “Best Mates” stamp set and Doodle Bug Design 6x6 paper pad “Anchors aweigh”.  But first I wanted to let you know that sometimes in life you need a break.  I took a much needed 3-week break from all of my design teams.  Now I am back and I feel refreshed and ready to create, so much so in fact that I have TWO cards to share with you!

 Here is what I created: 


I am a sketch girl.
I LOVE sketches.
I knew I was going to use this stamp set and this paper pad for my project.  As I was looking at different sketches, I came across Tuesday's Morning Sketch that posted on 06/12.
I knew this sketch would work!  I had already stamped out the images (multiple times in fact) and cut them out using my Scan n' Cut (LOVE this machine!)  Next I looked through the paper pad to find two different types of paper to use.  I ended up finding 2 sets of 2, so I figured, why not make two cards?  Once I figured out my paper I started coloring, followed by cutting my paper to the right size, stamping my sentiment, and then gluing everything down.  

Here is what I used: 
La-La Land Craft’s “Best Mates
Doodle Bug Design 6x6 paper pad “Anchors aweigh

Copics
Pig – B26, R20, R35
Bear – B26, R20, R35, E34
Rabbit – B26, C2, R20, R35, YR20
Elephant – B26, C2, R35, YG63
Cat – B26, R20, R35, YG63, YR12, YR20
Seal – B26, C2, R35


 Thank you for stopping by.  Make each day creatively crafty and stay tuned for more craftiness!

~2CraftyKaties